Using Git with PowerShell on Windows 10
This article has been updated to reflect Git for Windows version 2.13.2 and a new version of posh-git; the PowerShell scripts have been changed to address issues raised by commenters. The previous version was posted on 12 March 2016, and any comments on this page that were written prior to 22 July 2017 are referencing that older version.
How to install Git on Windows 10 systems and run Git from a PowerShell command line.
- Installing Git
- Adjusting the installed shortcuts
- Configure a simple Git PowerShell command window
- Get useful CLI sugar with posh-git
- ssh-agent
- Other tweaks
- Upgrading Git
Installing Git
On modern Windows systems, the best way to get Git is to use the installers produced by the Git for Windows project.
Download the install kit from https://git-for-windows.github.io/. This will download the installer for the latest release, and that will install 64-bit software. If you want 32-bit software, or a specific Git for Windows version, then visit the release section of the git-for-windows project: https://github.com/git-for-windows/git/releases.
Launch the installer as the administrator1 and walk through the installation2 dialog panels as follows:
-
License. Next.

-
Install path. If this isn’t installing in
Program Filesthen you probably didn’t run the installer with elevated privilege1. Next.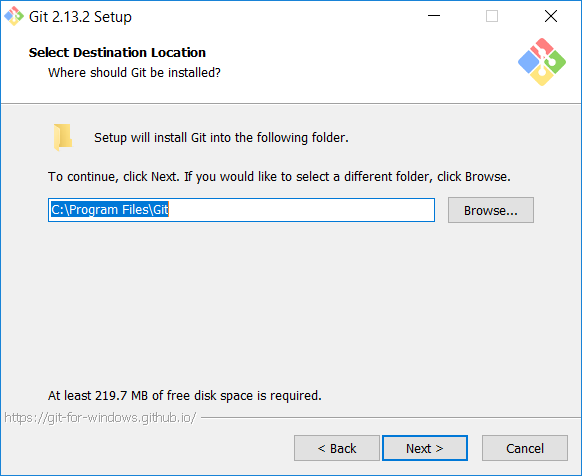
-
Select options to be installed. Because the goal is to minimize the impact on the Windows system, and to run Git from a PowerShell command line, I recommend only checking the Git LFS (Large File Support).
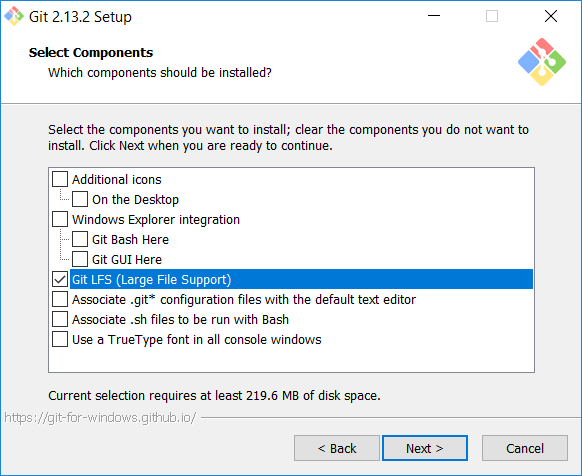
Only Git LFS. Next.
-
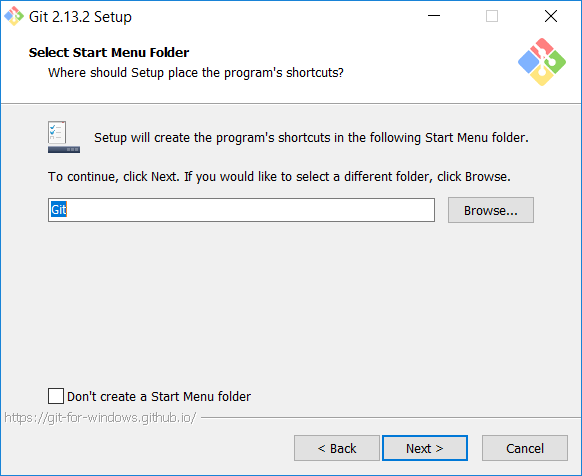
Start menu folder name. Next.
-
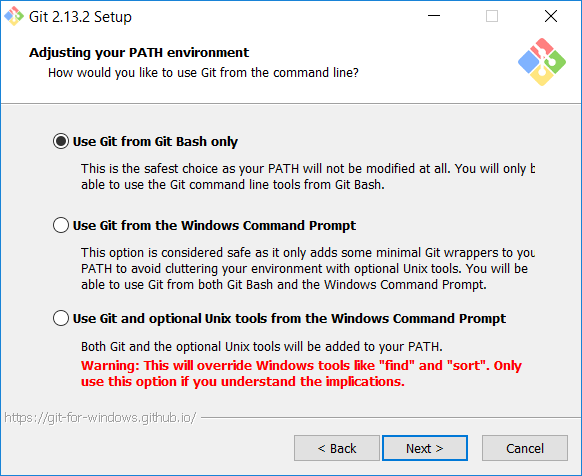
Adjusting the PATH. Leave the default option, the one that does not modify the path. Next.
-
Choose a trusted store for TLS certificate authorities (CAs). Unless you know you need the OpenSSL CA bundle, select “Use the native Windows Secure Channel library”.
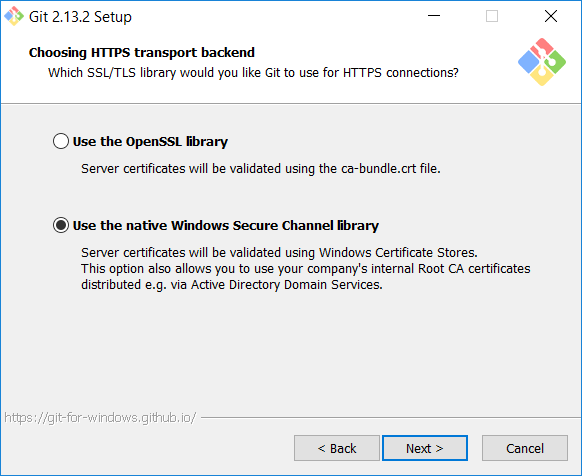
Use the native Windows Secure Channel library. Next.
-
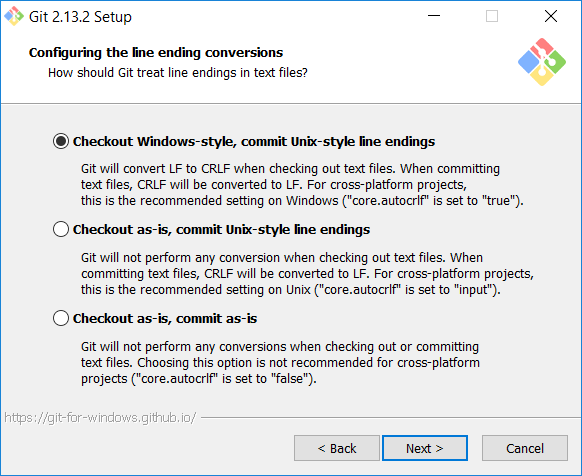
Line ending conversion. Leave the default option, the one that checks out Windows-style line endings and commits Unix-style line endings. Next.
-
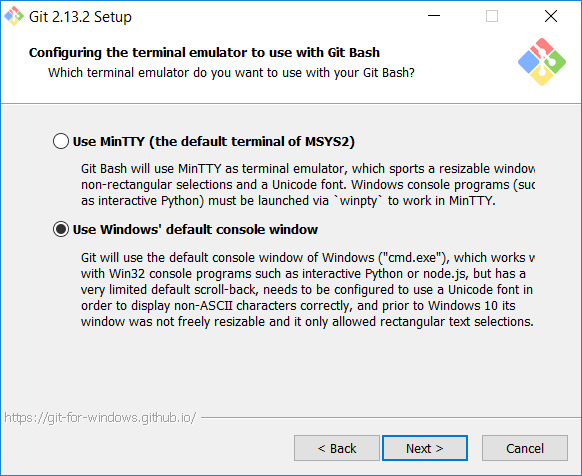
Select the terminal emulator. On a Windows 8.1 (or Server 2012 R2) or earlier system, leave the default selection (MinTTY).
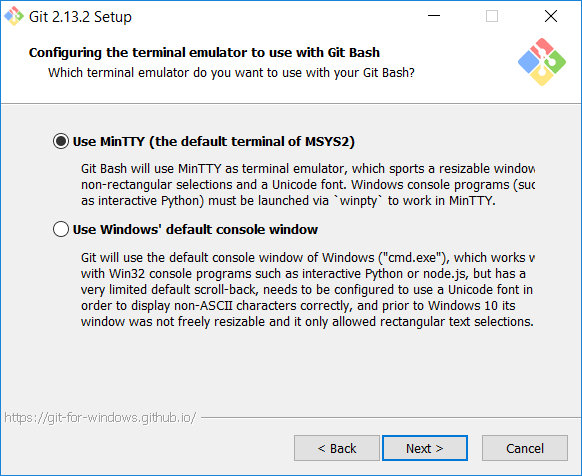
On a Windows 10 system, change to use the Windows’ default console window. Next.
-
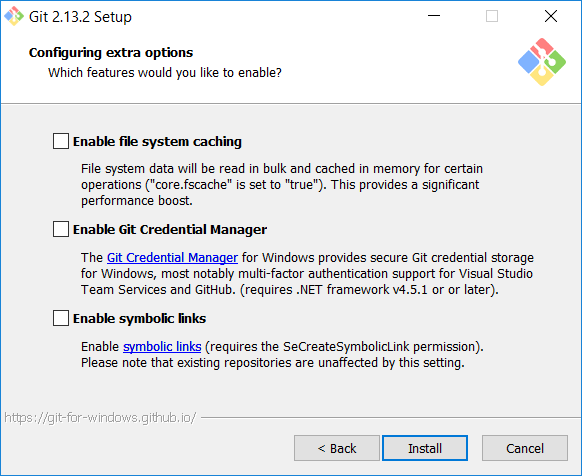
Extra options. Don’t select anything. Next.
-
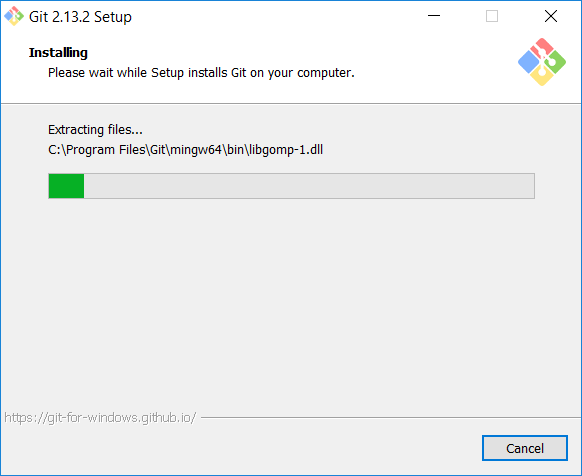
Watch the install proceed.
-
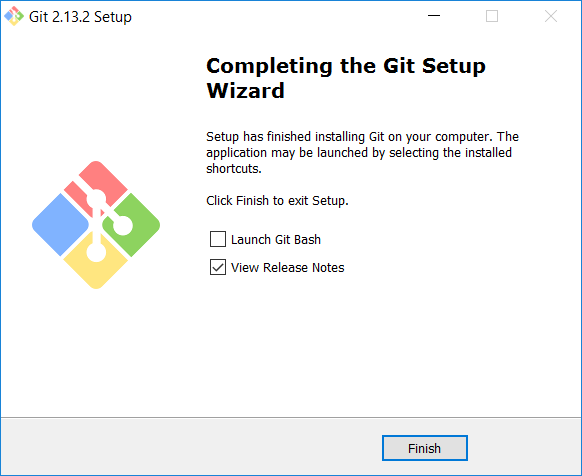
Install completed. Click Finish and read the release notes. Really. Especially the known issues section.
Adjusting the installed shortcuts
The installer will have laid down three shortcuts in the start menu.
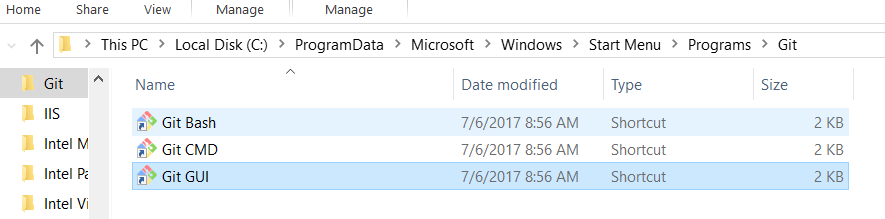
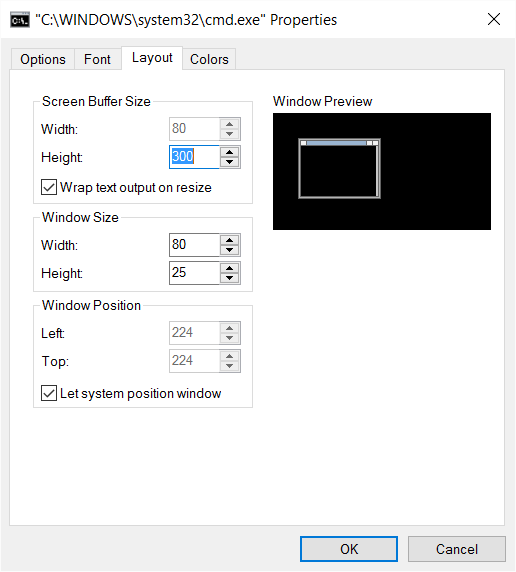
These shortcuts are of secondary importance; the primary goal is to use Git from a PowerShell command line. However, you may find reasons to use either Git Bash or Git CMD. So configure them now; launch each3 and configure the window properties4 to enable Quick Edit and set the scroll buffer to 9999 lines.
-
Go to the “Options” tab.
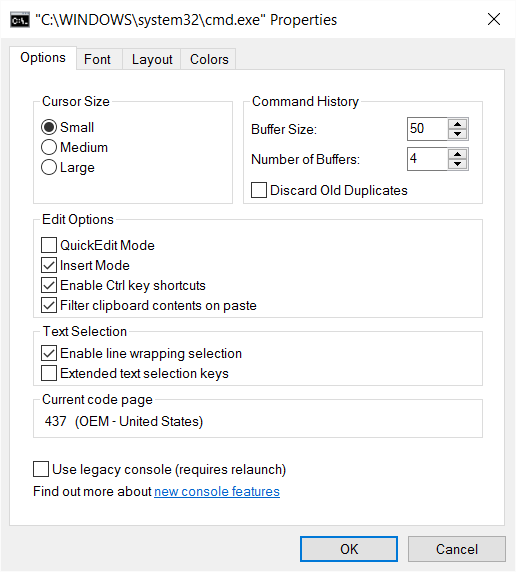
-
Make sure QuickEdit Mode is checked.

-
Go to the “Layout” tab.
-
Change the Height property of the Screen Buffer Size to 9999.

-
Click the “OK” button.
It’s worth launching a command window and checking to see that the expected version of Git is installed and running.
Configure a simple Git PowerShell command window
Use the file explorer to navigate to :\Windows\System32\WindowsPowerShell\v1.0 and right-click on powershell.exe to create a shortcut on the desktop. Rename that shortcut to “Windows PowerShell (bootstrap)” and then move it to the Start Screen folder.5
Edit shortcut properties to change the shortcut target to:
%SystemRoot%\system32\WindowsPowerShell\v1.0\powershell.exe -NoExit -ExecutionPolicy Unrestricted -NoProfile -File %USERPROFILE%\Documents\WindowsPowerShell\bootstrap-git.profile.ps1
The -NoProfile argument is important. It prevents any default profiles from loading; and that will avoid introducing issues and injecting kruft that can send you down a troubleshooting rat hole. Yep, I speak from experience.
While you are in properties dialog, you might as well set the scroll buffer to 9999 and enable QuickEdit.
Now, using your favorite programming editor, create the PowerShell profile script %USERPROFILE%\Documents\WindowsPowerShell\bootstrap-git.profile.ps1 with this content:
# Start a transcript
#
if (!(Test-Path "$Env:USERPROFILE\Documents\WindowsPowerShell\Transcripts"))
{
    if (!(Test-Path "$Env:USERPROFILE\Documents\WindowsPowerShell"))
    {
        $rc = New-Item -Path "$Env:USERPROFILE\Documents\WindowsPowerShell" -ItemType directory
    }
    $rc = New-Item -Path "$Env:USERPROFILE\Documents\WindowsPowerShell\Transcripts" -ItemType directory
}
$curdate = $(get-date -Format "yyyyMMddhhmmss")
Start-Transcript -Path "$Env:USERPROFILE\Documents\WindowsPowerShell\Transcripts\PowerShell_transcript.$curdate.txt"

# Alias Git
#
New-Alias -Name git -Value "$Env:ProgramFiles\Git\bin\git.exe"
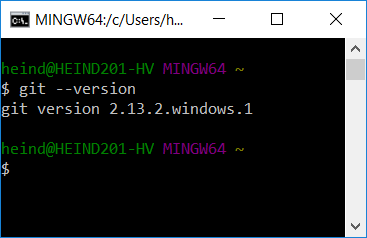
Launch the shortcut. Enter the command git --version. You should see the expected Git version.
Great! You’ve got Git running in PowerShell. :-).
Get useful CLI sugar with posh-git
posh-git is a PowerShell module that adds tab completion for Git commands and also a very helpful colorized command prompt that shows the branch and status of the current repo, including remote repo status. You will want to install posh-git.
I recommend using the manual install method so that you can keep posh-git up to date with the latest patches.
- In your new PowerShell window, check the execution policy with
Get-ExecutionPolicy. It should beRemoteSignedorUnrestricted.6 cd ~\Documentsand create a directoryGitHub.cd GitHubgit clone https://github.com/dahlbyk/posh-git.gitcd posh-git
In the current directory you should now see a file called example.profile.ps1. That is an example of how to load the posh-get module and start the ssh-agent (used to avoid repeated password prompts from SSH—more on that in the next section).
I’ve taken that example and tweaked it a bit to have better colorization in the command prompt and to work from any working directory. I put it in a script file that can be included (via the source command, “.”) in any profile. The script is called posh-git.src.ps1, and it looks like this:
# Add Git and associated utilities to the PATH
#
# NOTE: aliases cannot contain special characters, so we cannot alias
#       ssh-agent to 'ssh-agent'. The posh-git modules tries to locate
#       ssh-agent relative to where git.exe is, and that means we have
#       to put git.exe in the path and can't just alias it.
#
#
$Env:Path = "$Env:ProgramFiles\Git\bin" + ";" + $Env:Path

# Load post-git
#
Push-Location (Resolve-Path "$Env:USERPROFILE\Documents\GitHub\posh-git")

# Load posh-git module from current directory
#
# Import-Module .\posh-git
if (Test-Path -LiteralPath ($modulePath = Join-Path (Get-Location) (Join-Path src 'posh-git.psd1'))) {
    Import-Module $modulePath
}
else {
    throw "Failed to import posh-git."
}

# If module is installed in a default location ($Env:PSModulePath),
# use this instead (see about_Modules for more information):
# Import-Module posh-git

# Set up a simple prompt, adding the git prompt parts inside git repos
function global:prompt {
    $realLASTEXITCODE = $LASTEXITCODE

    # # Reset color, which can be messed up by Enable-GitColors
    # $Host.UI.RawUI.ForegroundColor = $GitPromptSettings.DefaultForegroundColor

    # Write-Host($pwd.ProviderPath) -nonewline
    Write-Host($pwd.ProviderPath)

    Write-VcsStatus

    $global:LASTEXITCODE = $realLASTEXITCODE
    return "> "
}

# Override some Git colors

$s = $global:GitPromptSettings
$s.LocalDefaultStatusForegroundColor    = $s.LocalDefaultStatusForegroundBrightColor
$s.LocalWorkingStatusForegroundColor    = $s.LocalWorkingStatusForegroundBrightColor

$s.BeforeIndexForegroundColor           = $s.BeforeIndexForegroundBrightColor
$s.IndexForegroundColor                 = $s.IndexForegroundBrightColor

$s.WorkingForegroundColor               = $s.WorkingForegroundBrightColor

Pop-Location

# Start the SSH Agent, to avoid repeated password prompts from SSH
#
Start-SshAgent -Quiet
Also create a simple script that sets up the session transcript, called transcript.src.ps1. Something like this:
# Start a transcript
#
if (!(Test-Path "$Env:USERPROFILE\Documents\WindowsPowerShell\Transcripts"))
{
    if (!(Test-Path "$Env:USERPROFILE\Documents\WindowsPowerShell"))
    {
        $rc = New-Item -Path "$Env:USERPROFILE\Documents\WindowsPowerShell" -ItemType directory
    }
    $rc = New-Item -Path "$Env:USERPROFILE\Documents\WindowsPowerShell\Transcripts" -ItemType directory
}
$curdate = $(get-date -Format "yyyyMMddhhmmss")
Start-Transcript -Path "$Env:USERPROFILE\Documents\WindowsPowerShell\Transcripts\PowerShell_transcript.$curdate.txt"
Now we can create a new profile script, posh-git.profile.ps1 and use that to launch a PowerShell window that has Git and posh-git activated. My example of that script looks like:
# Start a transcript
#
. "$Env:USERPROFILE\Documents\WindowsPowerShell\transcript.src.ps1"

# Active Git and posh-git
#
. "$Env:USERPROFILE\Documents\WindowsPowerShell\posh-git.src.ps1"
Create another shortcut similar to the “Windows PowerShell (bootstrap)” shortcut you created before, but name it “Windows PowerShell (posh-git)” and set the Target to:
%SystemRoot%\system32\WindowsPowerShell\v1.0\powershell.exe -NoExit -ExecutionPolicy Unrestricted -NoProfile -File %USERPROFILE%\Documents\WindowsPowerShell\posh-git.profile.ps1
Pin that shortcut to the Start Screen and the Task Bar and you are good to go.
ssh-agent
The script above will launch an ssh-agent process (if one is not already running). ssh-agent caches private key passphrases and supplies them to Git when needed. This is helpful for avoiding a passphrase prompt every time you execute a Git command that touches the remote repo. You will want to use ssh-agent.
To store your passphrase with the ssh-agent process, use the ssh-add command to cache the passphrase for a private key, like so:
& "C:\Program Files\Git\usr\bin\ssh-add.exe" ~\.ssh\github-myid-rsa
That command will prompt you for the passphrase. If you enter the correct one, then all further use of that private key by Git will not again prompt for the passphrase.
Other tweaks
I like slightly different colors in my Git command output, so I set my Git global config7 to include these colorization overrides:
color.ui=auto
color.branch.current=green bold
color.branch.remote=red bold
color.status.add=green bold
color.status.added=green bold
color.status.updated=green bold
color.status.changed=red bold
color.status.untracked=red bold
I also like to use Sublime Text 3 as my editor, so:
core.editor=subl -w
And I have a custom commit message template, referenced via:
commit.template=C:\Users\heind.CORP\.gitmessage.txt
It just has column numbering so I can see how long my lines are, and keep the first line under 50 characters (to make git commit history looking pretty). The template looks like this:
#000000001111111111222222222233333333334444444444*5555555556666666666677
#234567890123456789012345678901234567890123456789*1234567890123456789012
Upgrading Git
To upgrade Git for Windows to a new version, just run the new installer (making sure to run it as administrator). The installer will remember the configuration choices you made during the last install, so it should just be a matter of repeatedly clicking “Next”. It is probably a good idea to close any command windows that might have activated Git. And you may get prompted to kill any running ssh-agent.exe processes.
-
Right click on the file and select “Run as administrator”. Or open a command using using “Run as administrator” and run the installer EXE from that command line. ↩ ↩2
-
I downloaded the 2.13.2 installer, Git-2.13.2-64-bit.exe, and ran it (as administrator) on my Windows 10 box. ↩
-
You may need to launch the command windows using “Run as administrator” to have the privileges needed to save the window property changes. ↩
-
Edit window properties by pulling down the window’s System Menu (click on the icon in the upper left of the title bar) and selecting “Properties”. You enable QuickEdit Mode from the “Options” tab. You set the scroll buffer size on the “Layout” tab by setting the Height property of the “Screen Buffer size” to 9999. ↩
-
On my system, the Start Menu folder is
C:\Users\heind.CORP\AppData\Roaming\Microsoft\Windows\Start Menu\Programs. You can find the location of your own Start Screen by right-clicking on any Start Screen shortcut, selecting “More” and then “Open file location”. ↩ -
If not
RemoteSignedorUnrestrictedthen run PowerShell as administrator and callSet-ExecutionPolicy RemoteSigned -Scope CurrentUser -Confirm. ↩ -
To set the global config use a command like
git config --global color.status.add 'green bold'. ↩
- show comments